
17.1 Building the Java 3D Swing application
17.2 Adding support for running as an applet
We have reached the point where we can build a complete Java 3D application that integrates Swing for the 2D interface components and Java 3D for a 3D rendering window.
In addition, we will attempt to deploy the application as an applet using the Java 2 SDK plug-in. This is an ambitious and challenging deployment environment, but improvements in the runtime installation of Java 2 and the Java 2 plug-in are making this an increasingly viable possibility. Java WebStart represents an exciting development in this area, which may make one-click distribution, installation, and launch of Java 2-based applications a reality. A high level overview of the SwingTest example is presented along with extensive source code annotations. Please refer to http://java.sun.com/products/javawebstart/ for Java WebStart documentation.
SwingTest) has the following features:
JmenuBar-based menu system, for the UI.
SimpleUniverse utility class.
The Java 3D demo applications from Sun used the SimpleUniverse utility class to build the scenegraph for the applications. SwingTest will build the whole scenegraph from scratch, so you can relate the various classes to each other and how they are combined to produce screen output (figure 17.1). The SimpleUniverse class is useful for quick Java 3D prototypes; however, it hides many of the interesting and powerful features of Java 3Ds view model.
The code in this example is all in one class, SwingTest, which is actually a Swing JPanel. This is the approach that has been taken for much of the example code, but you should not emulate it for your applications. You should aim to break your applications functionality into far more discrete pieces, pushing the functionality down the class hierarchy as much as possible. Other examples use utility classes defined in the org.selman.java3d.book package, which you should be able to reuse in building your applications. This example does not rely on any external library code, so you can see the entire application and how all the pieces relate to one another.
SwingTest example running as an application. Combines Swing, Java 3D, dynamic scenegraph modifications, and off-screen rendering
| From SwingTest.java |
//These are the fairly standard imports that we will be using//for many of the examples in the book. The core Java 3D code//resides in the javax.media.j3d package.import java.applet.Applet; import java.awt.*; import java.awt.event.*; import java.awt.image.*; import java.io.*;
import javax.media.j3d.*; import javax.vecmath.*; import javax.swing.*;
import com.sun.image.codec.jpeg.*;
/* * The SwingTest class extends the Swing JPanel and * can therefore be added to a Swing JFrame or JPanel as a component * of the user interface. The SwingTest class contains the 3D display, * and responds to Swing user interface events by implementing * the ActionListener interface. The main entry point for the * application creates the JFrame that will house the SwingTest JPanel * as well as the JmenuBar, which will generate the User Interface * events. */ public class SwingTest extends JPanel implements ActionListener { /* * Java 3D applications describe a 3D scene to the rendering system * that produces the rendered frames. The 3D scene description * is added to a tree (directed-acyclic-graph) data structure * called a scenegraph. The scenegraph tree has two major branches: * the scene branch describes the objects and lights in the scene * as well as any behaviors that act upon the scene. The view branch * of the scenegraph describes the viewer of the scene, including * their position, screen device, and viewing parameters. * * SwingTest needs to modify the objects on the scene side * of the scenegraph at runtime, so we keep a reference to it in the * sceneBranchGroup member variable below. */ private BranchGroup sceneBranchGroup = null;
/* * SwingTest rotates the objects in the scene using a * RotationInterpolator behavior that will automatically modify * the rotation components of a 4 × 4 transformation matrix. * Objects that are attached to the transformation matrix object * (TransformGroup) will therefore be automatically rotated. */ private RotationInterpolator rotator = null;
/* Java 3D will render the scene into a Canvas3D component. * To perform frame captures and save the frames to disk, we keep * a reference to an offscreen (nonvisible) Canvas3D component that * can be explicitly called to render individual frames. */ private Canvas3D offScreenCanvas3D = null;
/* * The image that is attached to the off-screen Canvas3D and * contains the results of screen captures */ private ImageComponent2D imageComponent = null;
//The width of the offscreen Canvas3D private static final int offScreenWidth = 400;
//The height of the offscreen Canvas3D private static final int offScreenHeight = 400;
//Constructor. //Set the layout algorithm for the panel and initialize Java 3D //and the scene. public SwingTest() { setLayout( new BorderLayout() ); init(); }
//The init method does all of the work of setting up and //populating the scenegraph. protected void init() { /* * Every Java 3D application has an instance of a class derived from * VirtualUniverse. The VirtualUniverse class contains a number of * Locales objects, each of which describes a discrete region * within the scene, and has its own coordinate system. By deriving * your own class from VirtualUniverse you can define utility methods * or additional datastructures for your application. */ VirtualUniverse universe = createVirtualUniverse();
/* * A Locale object allows a coordinate system to be specified * for a region within the scene. By having multiple Locales * in your scene you can have multiple levels of detail without * losing coordinate precision due to rounding errors. */ Locale locale = createLocale( universe );
/* * A BranchGroup is a branch of the scenegraph tree. A BranchGroup * has a single parent Node and can have multiple child Nodes. The * sceneBranchGroup created below contains the graphical objects, * lights, and behaviors that will compose the rendered scene. */ BranchGroup sceneBranchGroup = createSceneBranchGroup();
/* * A Background Node allows you to specify a colored background, * background image, or background geometry for your application. * In this example we simply create a light-gray background color and * add it to the scene side of the scenegraph. Java 3D will * automatically detect that it is a Background Node and * paint the background color into the Canvas3D prior to rendering * the scene geometry. */ Background background = createBackground();
if( background != null ) sceneBranchGroup.addChild( background );
/* * We must now define the view side of the scenegraph. First * we create a ViewPlatform. The ViewPlatform defines a location * in the scene from which the scene can be viewed. The scene * can contain multiple ViewPlatforms, and View objects can be moved * between them at runtime. */ ViewPlatform vp = createViewPlatform();
/* * To contain the ViewPlatform we create a scenegraph branch. * We create a BranchGroup that is the top of the view branch. * Underneath it we create a series of TransformGroup, and then * finally we attach the ViewPlatform to the lowest TransformGroup. * The TransformGroups (which contain a 4 × 4 transformation matrix) * allow the ViewPlatform to be rotate, scaled, and translated within * the scene. */ BranchGroup viewBranchGroup = createViewBranchGroup( getViewTransformGroupArray(), vp );
//We then have to add the scene branch to the Locale //we added previously to the VirtualUniverse. locale.addBranchGraph( sceneBranchGroup );
//Add the view branch to the Locale addViewBranchGroup( locale, viewBranchGroup );
/* * Finally, create the View object and attach it to * the ViewPlatform. The View object has an associated * PhysicalEnvironment and PhysicalBody that defines the * characteristics of the viewer and their display hardware. * A Canvas3D rendering component is attached to the View which * is used to display the frames rendered. */ createView( vp ); }
/* * Callback to allow the Canvas3D to be added to a Panel. This method * is called by createView and allows the Canvas3D to be added to its * parent GUI components, in this can as SwingTest is extends JPanel we * can just add it directly to SwingTest. */ protected void addCanvas3D( Canvas3D c3d ) { add( "Center", c3d ); }
//Helper method to create a Java 3D View and //attach it to a ViewPlatform . protected View createView( ViewPlatform vp ) { View view = new View();
//We create a default PhysicalBody and PhysicalEnvironment and //associate them with the View. PhysicalBody pb = createPhysicalBody(); PhysicalEnvironment pe = createPhysicalEnvironment(); view.setPhysicalEnvironment( pe ); view.setPhysicalBody( pb ); //Add the View to the ViewPlatform if( vp != null ) view.attachViewPlatform( vp );
/* * Set the locations of the clipping planes for the View. * Java 3D uses a finite number of bits (in a depth-buffer) to * track the relative distances of objects from the viewer. * These depth-buffer bits are used to track objects between * the front clipping plane and the rear clipping plane. Only objects * that fall between the two clipping planes will be rendered. As the * depth-buffer bits have a finite length (usually 16 or 24 bits) * the ratio between the front clipping plane and the rear clipping * plane should be less than about 1000, or the depth-buffer will be * very coarsely quantized and accuracy will be lost. In this example * we use 1.0 for the front clipping plane and 100.0 for the rear * clipping plane. */ view.setBackClipDistance( getBackClipDistance() ); view.setFrontClipDistance( getFrontClipDistance() );
//Create the Canvas3D used to display the rendered scene Canvas3D c3d = createCanvas3D( false );
//Add the Canvas3D to the View so that the View has a component //to render into. view.addCanvas3D( c3d );
//Here we create and add on the offscreen Canvas3D instance //that we use for screen captures. view.addCanvas3D( createOffscreenCanvas3D() );
//Finally, invoke the addCanvas3D callback method that will add //the visible Canvas3D to a GUI component (JPanel) addCanvas3D( c3d );
return view; }
/Simple utility method to create a solid colored background for //the Canvas3D. protected Background createBackground() { //We create a color by specifying the Red, Green, and Blue //components, in this case a light gray. Background back = new Background( new Color3f( 0.9f, 0.9f, 0.9f ) );
//We need to set the volume within the scene within which the //Background is active back.setApplicationBounds( createApplicationBounds() ); return back; }
/* * Simple utility method that returns a bounding volume * for the application. In this case we create a spherical volume, * centered at 0,0,0 and with a radius of 100. */ protected Bounds createApplicationBounds() { return new BoundingSphere(new Point3d(0.0,0.0,0.0), 100.0); }
//Utility method to create a Canvas3D GUI component. The Canvas3D //is used by Java 3D to output rendered frames. protected Canvas3D createCanvas3D( boolean offscreen ) { /* * First we query Java 3D for the available device information. * We set up a GraphicsConfigTemplate3D and specify that we would * prefer a device configuration that supports antialiased output. */ GraphicsConfigTemplate3D gc3D = new GraphicsConfigTemplate3D(); gc3D.setSceneAntialiasing( GraphicsConfigTemplate.PREFERRED );
//We then get a list of all the screen devices for the //local graphics environment GraphicsDevice gd[] = GraphicsEnvironment. getLocalGraphicsEnvironment(). getScreenDevices();
//We select the best configuration supported by the first screen //device, and specify whether we are creating an onscreen or //an offscreen Canvas3D. Canvas3D c3d = new Canvas3D( gd[0].getBestConfiguration( gc3D ), offscreen );
/* * Here we have hard-coded the initial size of the Canvas3D. * However, because we have used a BorderLayout layout algorithm, * this will be automatically resized to fit-as the parent JFrame * is resized. */ c3d.setSize( 500, 500 );
return c3d; }
//Callback to get the scale factor for the View side of the //scenegraph protected double getScale() { return 3; }
/* * Get a TransformGroup array for the View side of the scenegraph. * We create a single TransformGroup (which wraps a 4 × 4 transformation * matrix) and modify the transformation matrix to apply a scale to * the view of the scene, as well as move the ViewPlatform back * by 20 meters so that we can see the origin (0,0,0). The objects * that we create in the scene will be centered at the origin, so if * we are going to be able to see them, we need to move the * ViewPlatform backward. */ public TransformGroup[] getViewTransformGroupArray() { TransformGroup[] tgArray = new TransformGroup[1]; tgArray[0] = new TransformGroup();
/* * Here we move the camera BACK a little so that we can see * the origin (0,0,0). Note that we have to invert the matrix as * we are moving the viewer not the scene. */ Transform3D t3d = new Transform3D(); t3d.setScale( getScale() ); t3d.setTranslation( new Vector3d( 0.0, 0.0, -20.0 ) ); t3d.invert(); tgArray[0].setTransform( t3d );
return tgArray; }
//Simple utility method that adds the View side of the scenegraph //to the Locale protected void addViewBranchGroup( Locale locale, BranchGroup bg ) { locale.addBranchGraph( bg ); }
//Simple utility method that creates a Locale for the //VirtualUniverse protected Locale createLocale( VirtualUniverse u ) { return new Locale( u ); }
//Create the PhysicalBody for the View. We just use a default //PhysicalBody. protected PhysicalBody createPhysicalBody() { return new PhysicalBody(); }
//Create the PhysicalEnvironment for the View. We just use a //default PhysicalEnvironment. protected PhysicalEnvironment createPhysicalEnvironment() { return new PhysicalEnvironment(); }
//Return the View Platform Activation Radius. protected float getViewPlatformActivationRadius() { return 100; }
//Create the View Platform for the View. protected ViewPlatform createViewPlatform() { ViewPlatform vp = new ViewPlatform(); vp.setViewAttachPolicy( View.RELATIVE_TO_FIELD_OF_VIEW ); vp.setActivationRadius( getViewPlatformActivationRadius() );
return vp; }
//Return the distance to the rear clipping plane. protected double getBackClipDistance() { return 100.0; }
//Return the distance to the near clipping plane. protected double getFrontClipDistance() { return 1.0; }
//Create the View side BranchGroup. The ViewPlatform is wired in //beneath the TransformGroups. protected BranchGroup createViewBranchGroup( TransformGroup[] tgArray, ViewPlatform vp ) { BranchGroup vpBranchGroup = new BranchGroup();
if( tgArray != null && tgArray.length > 0 ) { Group parentGroup = vpBranchGroup; TransformGroup curTg = null;
for( int n = 0; n < tgArray.length; n++ ) { curTg = tgArray[n]; parentGroup.addChild( curTg ); parentGroup = curTg; }
tgArray[tgArray.length-1].addChild( vp ); } else vpBranchGroup.addChild( vp );
return vpBranchGroup; }
//Create the VirtualUniverse for the application. protected VirtualUniverse createVirtualUniverse() { return new VirtualUniverse(); }
//Utility method that performs some additional initialization //for an offscreen Canvas3D. protected Canvas3D createOffscreenCanvas3D() { //First we create a Canvas3D and specify that it is to be used //for offscreen rendering. offScreenCanvas3D = createCanvas3D( true );
//We then need to explicitly set the size of the off screen //Canvas3D. offScreenCanvas3D.getScreen3D().setSize( offScreenWidth, offScreenHeight );
//This calculation returns the physical size of the screen and //is based on 90 display pixels per inch offScreenCanvas3D.getScreen3D(). setPhysicalScreenHeight( 0.0254/90 * offScreenHeight ); offScreenCanvas3D.getScreen3D(). setPhysicalScreenWidth( 0.0254/90 * offScreenWidth );
//We then create an AWT RenderedImage that the Canvas3D will //render into. We create a simple 3 Byte RGB format image. RenderedImage renderedImage = new BufferedImage( offScreenWidth, offScreenHeight, BufferedImage.TYPE_3BYTE_BGR );
//The AWT RenderedImage needs to be wrapped in a Java 3D //ImageComponent2D before it can be assigned to the //Canvas3D for rendering imageComponent = new ImageComponent2D( ImageComponent.FORMAT_RGB8, renderedImage );
//This call notifies Java 3D that we require read-access to the //ImageComponent2D. We will be reading the pixels in the image //when we output it to disk. imageComponent.setCapability( ImageComponent2D.ALLOW_IMAGE_READ );
//Finally, we assign the ImageComponent2D to the offscreen //Canvas3D for rendering offScreenCanvas3D.setOffScreenBuffer( imageComponent );
return offScreenCanvas3D; }
//Create the scene side of the scenegraph. This method does //all the work of creating the scene branchcontaining graphical //objects, lights, and rotation behaviors to rotate the objects. protected BranchGroup createSceneBranchGroup() { //First we create the root of the scene side scenegraph. We will //add other Nodes as children of this root BranchGroup. BranchGroup objRoot = new BranchGroup();
/* * Create a TransformGroup to rotate the objects in the scene * and set the capability bits on the TransformGroup so that * it can be modified at runtime by the rotation behavior. */ TransformGroup objTrans = new TransformGroup(); objTrans.setCapability(TransformGroup.ALLOW_TRANSFORM_WRITE); objTrans.setCapability(TransformGroup.ALLOW_TRANSFORM_READ);
//Create a spherical bounding volume that will define the volume //within which the rotation behavior is active. BoundingSphere bounds = new BoundingSphere( new Point3d(0.0,0.0,0.0), 100.0);
//Create a 4 × 4 transformation matrix Transform3D yAxis = new Transform3D();
/* * Create an Alpha interpolator to automatically generate * modifications to the rotation component of the transformation * matrix. This Alpha loops indefinitely and generates numbers * from 0 to 1 every 4000 milliseconds. */ Alpha rotationAlpha = new Alpha(-1, Alpha.INCREASING_ENABLE, 0, 0, 4000, 0, 0, 0, 0, 0);
/* * Create a RotationInterpolator behavior to effect the * TransformGroup. Here we will rotate from 0 to 2p degrees about * the Y-axis based on the output of rotationAlpha. */ rotator = new RotationInterpolator( rotationAlpha, objTrans, yAxis, 0.0f, (float) Math.PI*2.0f );
//Set the scheduling bounds on the behavior. This defines the //volume within which this behavior will be active. rotator.setSchedulingBounds( bounds );
//Add the behavior to the scenegraph so that Java 3D //can schedule it for activation. objTrans.addChild(rotator);
/* * Create the BranchGroup which contains the objects we add/remove * to and from the scenegraph. We store a reference to this subbranch * of the scene side of the scenegraph in a member variable * as we need to modify the contents of the branch at runtime. */ sceneBranchGroup = new BranchGroup();
//Allow the BranchGroup to have children added and removed //at runtime sceneBranchGroup.setCapability( Group.ALLOW_CHILDREN_EXTEND ); sceneBranchGroup.setCapability( Group.ALLOW_CHILDREN_READ ); sceneBranchGroup.setCapability( Group.ALLOW_CHILDREN_WRITE );
//Add the subbranches for both the cube and the sphere to //the BranchGroup sceneBranchGroup.addChild( createCube() ); sceneBranchGroup.addChild( createSphere() );
//Create the colors for the lights Color3f lColor1 = new Color3f( 0.7f,0.7f,0.7f ); Vector3f lDir1 = new Vector3f( -1.0f,-1.0f,-1.0f ); Color3f alColor = new Color3f( 0.2f,0.2f,0.2f );
//Create an ambient light AmbientLight aLgt = new AmbientLight( alColor ); aLgt.setInfluencingBounds( bounds );
//Create a directional light DirectionalLight lgt1 = new DirectionalLight( lColor1, lDir1 ); lgt1.setInfluencingBounds( bounds );
//Add the lights to the scenegraph objRoot.addChild(aLgt); objRoot.addChild(lgt1);
/* * Wire the scenegraph together. It is useful to do this * in the reverse order that the branches were created * rather like closing parentheses, that way you will not forget * to add a child branch to its parent. If you forget to add a branch * that you have created and populated then it will just not * show up in the scene! */ objTrans.addChild( sceneBranchGroup ); objRoot.addChild( objTrans );
//Return the root of the scene side of the scenegraph return objRoot; }
/* * Create a BranchGroup that contains a Cube. The User Data * for the BranchGroup is set so the BranchGroup can be * identified later. User Data is a field that you can set * on all Nodes in the scenegraph to allow you to associate * your own data with particular scenegraph elements. The Cube * must wrapped in a BranchGroup as only BranchGroups can be * added and removed from the scenegraph at runtime * not Shape3Ds themselves which describe the geometry. */ protected BranchGroup createCube() { //Create a parent BranchGroup for the Cube BranchGroup bg = new BranchGroup();
//Tell Java 3D that we need the ability to detach this BranchGroup //from its parent Node. bg.setCapability( BranchGroup.ALLOW_DETACH );
//Add a Shape3D (geometry) Node to the BranchGroup bg.addChild( new com.sun.j3d.utils.geometry.ColorCube() );
//Set the User Data on the BranchGroup so that we can easily //identify this BranchGroup later, when we need to remove it. bg.setUserData( "Cube" ); return bg; }
//Create a BranchGroup that contains a Sphere. The user data for //the BranchGroup is set so the BranchGroup can be identified. protected BranchGroup createSphere() { BranchGroup bg = new BranchGroup();
//Tell Java 3D that we need the ability to detach this BranchGroup //from its parent Node. bg.setCapability( BranchGroup.ALLOW_DETACH );
//So that the Sphere is nicely shaded and responds to the lights //in the scene, we create an Appearance with a Material //for the Sphere. Appearance app = new Appearance(); Color3f objColor = new Color3f(1.0f, 0.7f, 0.8f); Color3f black = new Color3f(0.0f, 0.0f, 0.0f); app.setMaterial(new Material(objColor, black, objColor, black, 80.0f));
//Create the Sphere and assign the Appearance. bg.addChild( new com.sun.j3d.utils.geometry.Sphere( 1, app ) );
//Set the User Data on the BranchGroup so that we can easily //identify this BranchGroup later, when we need to remove it. bg.setUserData( "Sphere" ); return bg; }
//Remove a BranchGroup from the scene based on the User Data. //This allows us to dynamically remove the Cube or Sphere //BranchGroups at runtime. protected void removeShape( String name ) { try { //First we get all the child Nodes from the parent of the Cube //and/or Sphere BranchGroups java.util.Enumeration enum = sceneBranchGroup.getAllChildren(); int index = 0;
//We then need to iterate through the Nodes to find the one with //the User Data that we would like to remove while ( enum.hasMoreElements() != false ) { SceneGraphObject sgObject = (SceneGraphObject) enum.nextElement();
//Get the User Data for the ScenegraphObject Object userData = sgObject.getUserData();
//Compare the current ScenegraphObjects User Data with //what we are looking for, if they match then we can remove //the BranchGroup. if ( userData instanceof String && ((String) userData).compareTo( name ) == 0 ) { System.out.println( "Removing: " + sgObject.getUserData() ); sceneBranchGroup.removeChild( index ); }
index++; } } catch( Exception e ) { /* * The scenegraph may not have yet been synchronized. It is possible * for an exception to be thrown here as the removing a BranchGroup * is not instantaneous. */ } }
//Called to render the scene into the offscreen Canvas3D and //save the image (as a JPEG) to disk. protected void onSaveImage() { offScreenCanvas3D.renderOffScreenBuffer(); offScreenCanvas3D.waitForOffScreenRendering(); System.out.println( "Rendered to offscreen" );
try { FileOutputStream fileOut = new FileOutputStream( "image.jpg" );
JPEGImageEncoder encoder = JPEGCodec.createJPEGEncoder( fileOut ); encoder.encode( imageComponent.getImage() );
fileOut.flush(); fileOut.close(); } catch( Exception e ) { System.err.println( "Failed to save image: " + e ); } System.out.println( "Saved image." ); }
/* * AWT callback to indicate that an items has been selected * from a menu. This is not the way to implement menu handling * for a large application (!) but it serves for our simple example. */ public void actionPerformed( ActionEvent ae ) { System.out. println( "Action Performed: " + ae.getActionCommand() );
java.util.StringTokenizer toker = new java.util.StringTokenizer( ae.getActionCommand(), "|" );
String menu = toker.nextToken(); String command = toker.nextToken();
if ( menu.equals( "File" ) ) { if ( command.equals( "Exit" ) ) { System.exit( 0 ); } else if ( command.equals( "Save Image" ) ) { onSaveImage(); } } else if ( menu.equals( "View" ) ) { if ( command.equals( "Cube" ) ) { removeShape( "Sphere" ); sceneBranchGroup.addChild( createCube() ); } else if ( command.equals( "Sphere" ) ) { removeShape( "Cube" ); sceneBranchGroup.addChild( createSphere() ); } } else if ( menu.equals( "Rotate" ) ) { if ( command.equals( "On" ) ) { rotator.setEnable( true ); } else if ( command.equals( "Off" ) ) { rotator.setEnable( false ); } } }
//Helper method to creates a Swing JmenuItem and set the action //command to something we can distinguish while handling menu events. private JMenuItem createMenuItem( String menuText, String buttonText, ActionListener listener ) { JMenuItem menuItem = new JMenuItem( buttonText ); menuItem.addActionListener( listener ); menuItem.setActionCommand( menuText + "|" + buttonText ); return menuItem; }
/* * Registers a window listener to handle ALT+F4 window closing. * Otherwise the Swing application will just be made invisible when * the parent frame is closed. */ static protected void registerWindowListener( JFrame frame ) { //Disable automatic close support for Swing frame. frame. setDefaultCloseOperation( WindowConstants.DO_NOTHING_ON_CLOSE );
//Add the window listener frame.addWindowListener( new WindowAdapter() { //Handles the system exit window message public void windowClosing( WindowEvent e ) { System.exit( 1 ); } } ); }
/* * Main entry point for the application. Creates the parent JFrame, * the JMenuBar and creates the JPanel which is the application * itself. */ public static void main( String[] args ) { /* * Tell Swing that we need Popup Menus to be heavyweight. The Java 3D * window is a heavyweight window that is, the window is a native * window, and therefore any windows that must overlap it must also be * native. Our menu items will be dropped down in front of the * Java 3D Canvas3D so they must be created as heavyweight windows. */ JPopupMenu.setDefaultLightWeightPopupEnabled( false );
/* * Similarly we can declare that ToolTip windows are created * as heavyweight. Our application does not use tooltips. However, * if a toolbar was added the tooltips would overlap the Canvas3D * and would also need to be heavyweight windows. */ ToolTipManager ttm = ToolTipManager.sharedInstance(); ttm.setLightWeightPopupEnabled( false );
//Create the outermost frame for the application JFrame frame = new JFrame(); //Create the application JPanel, which contains the Canvas3D //with the 3D view. SwingTest swingTest = new SwingTest();
/* * Create a JMenuBar that will generate the events for the * application. We register the swingTest instance as a listener * for the action events generated by the menu items. */ JMenuBar menuBar = new JMenuBar(); JMenu menu = null;
//Create some menu items and add them to the JMenuBar menu = new JMenu( "File" ); menu.add( swingTest.createMenuItem( "File", "Save Image", swingTest ) ); menu.add( swingTest.createMenuItem( "File", "Exit", swingTest ) ); menuBar.add( menu );
menu = new JMenu( "View" ); menu.add( swingTest.createMenuItem( "View", "Cube", swingTest ) ); menu.add( swingTest.createMenuItem( "View", "Sphere", swingTest ) ); menuBar.add( menu );
menu = new JMenu( "Rotate" ); menu.add( swingTest.createMenuItem( "Rotate", "On", swingTest ) ); menu.add( swingTest.createMenuItem( "Rotate", "Off", swingTest ) ); menuBar.add( menu );
//Assign the JMenuBar to the parent frame. frame.setJMenuBar( menuBar );
//Add the SwingTest JPanel to the parent frame. frame.getContentPane().add( swingTest );
//Set the initial size of the parent frame frame.setSize( 550, 550 );
//Register a window listener to intercept the closing //of the parent frame. registerWindowListener( frame );
//Finally, make the parent frame visible! frame.setVisible( true ); } }
![]()
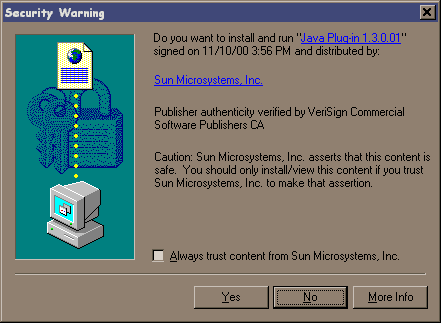
If you are running a flavor of Windows and you navigate to a web page that contains a Java applet (e.g., figure 17.2), the Java applet will be launched using the web browsers JVM. On a Windows machine, this will be the Microsoft VM, which does not implement the Java 2 (SDK 1.2) release of the J2SE platform. Your applets based on Java 2 will therefore not be started by the Microsoft VM.
As the relationship between Sun and Microsoft has been a little frosty of late, it is unlikely that Sun can negotiate with Microsoft to get its JVM shipped with new installations of Windows. This has forced Sun to develop the Java plug-in product. The Java plug-in is a web-browser plug-in that installs on a Windows machine and can download the Java 2 JRE and launch a Java 2 JVM capable of running Java 2 applications.
Because web-browser plug-ins can be installed with little user intervention by the web browser, the idea is that the installation and launch of the plug-in should be made as simple as possible.
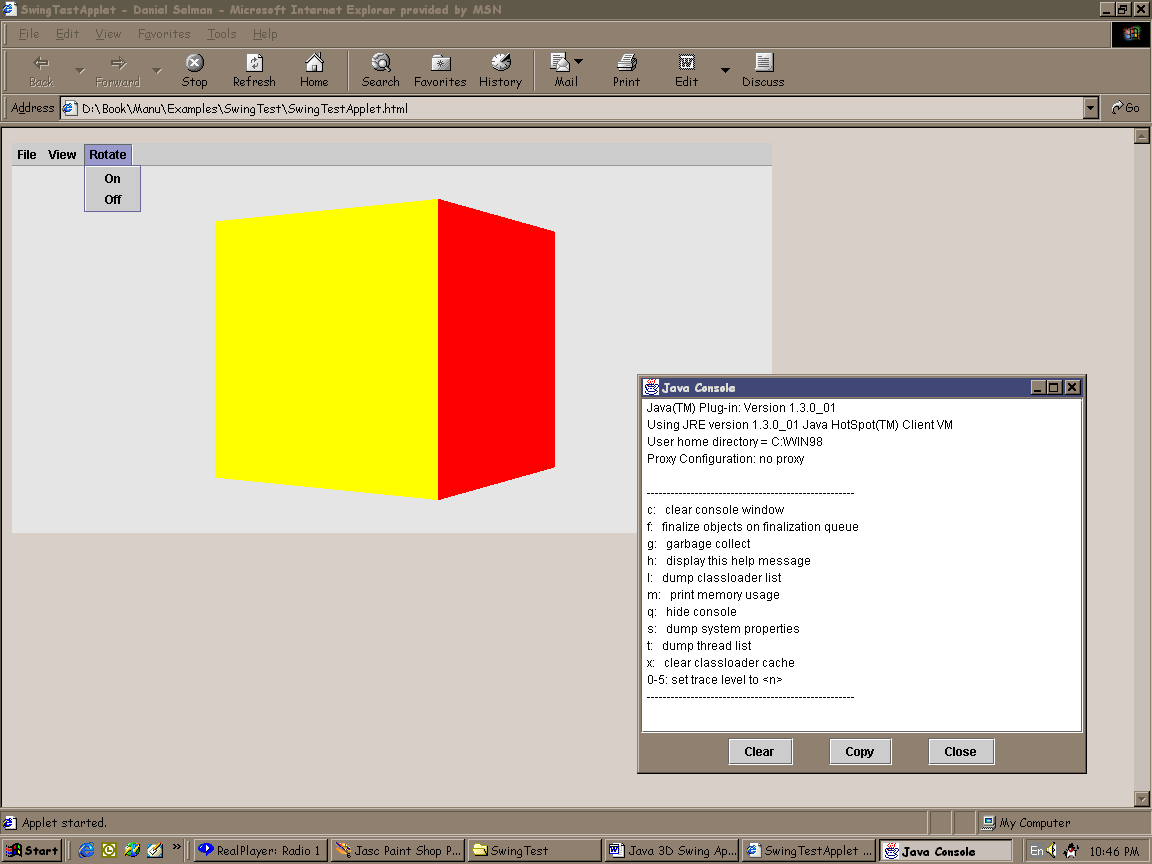
SwingTest example running as an applet inside Internet Explorer. Note Java 2 plug-in Swing console and the Duke icon in the system tray
For example, when you are developing your applet you might have an HTML page like that shown in figure 17.3 to launch it. This HTML page would work fine with Suns Java 2 applet viewer utility.
<html>
  <head>
      <title>SwingTestApplet - Daniel Selman</title>
  </head>
  <body>

<APPLET  CODE = SwingTestApplet WIDTH = 760 HEIGHT = 390 >
<PARAM NAME = ARCHIVE VALUE  = SwingTest.jar>

<!--"UNUSED PARAMETERS..."-->
<PARAM NAME = "IMAGE_WIDTH" VALUE  = "256">
<PARAM NAME = "IMAGE_HEIGHT" VALUE  = "256">

</APPLET>

</body>
</html>

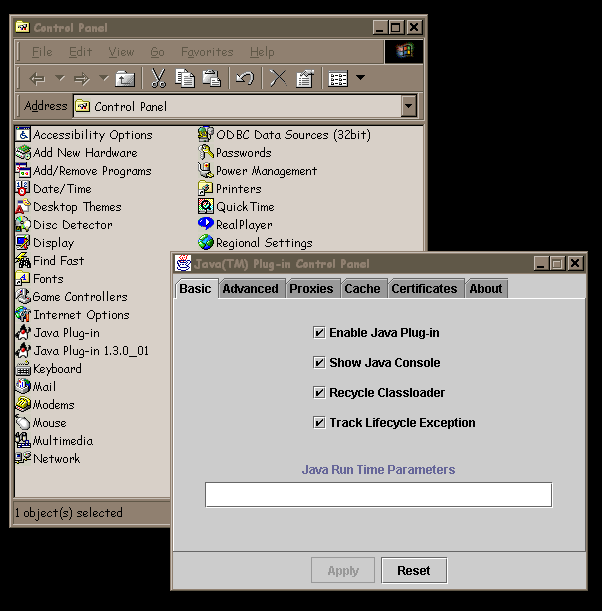
HTMLConverter. Note the template file option allows you to tailor your converted files to particular operating systems or browsers
To get the same applet to run with Internet Explorer or Netscape, your HTML page must first be converted to use the Java 2 plug-in. The HTML conversion process will take your original <APPLET> tags and wrap them in a web-browser plug-in <OBJECT> tag. The original <APPLET> parameters will be passed to the plug-in instead of invoked directly on the applet.
At the time of writing the latest version of the plug-in is: Java 2 SDK, Standard Edition (J2SE), Version 1.3.0_01 which also supports Netscape 6.0.
The limitations of the plug-in tend to change quite quickly, here are some references:
After you have installed the plug-in, you can invoke the HTML converter application and supply your original HTML file.
The output from the conversion process will produce a file similar to the following:
<html>
  <head>
      <title>SwingTestApplet - Daniel Selman</title>
  </head>
  <body>

<!--"CONVERTED_APPLET"-->
<!-- HTML CONVERTER -->
<OBJECT classid="clsid:E19F9330-3110-11d4-991C-005004D3B3DB"
WIDTH = 760 HEIGHT = 390  codebase="http://java.sun.com/products/plugin/1.3.0_
 01/jinstall-130_01-win32.cab#Version=1,3,0,1">
<PARAM NAME = CODE VALUE = SwingTestApplet >

<PARAM NAME="type"
 VALUE="application/x-java-applet;jpi-version=1.3.0_01">
<PARAM NAME="scriptable" VALUE="false">
<PARAM NAME = ARCHIVE VALUE   = SwingTest.jar>
<PARAM NAME = "IMAGE_WIDTH" VALUE   = "256">
<PARAM NAME = "IMAGE_HEIGHT" VALUE   = "256">
<COMMENT>
<EMBED type="application/x-java-applet;jpi-version=1.3.0_01"  CODE = Swing-
TestApplet WIDTH = 760 HEIGHT = 390 ARCHIVE =  SwingTest.jar IMAGE_WIDTH =
"256" IMAGE_HEIGHT =  "256"  scriptable=false pluginspage="http://
java.sun.com/products/plugin/1.3.0_01/plugin-install.html"><NOEMBED>
<!--"UNUSED PARAMETERS..."-->
</NOEMBED>
</EMBED>
</COMMENT>
</OBJECT>

<!--
<APPLET CODE = SwingTestApplet WIDTH = 760 HEIGHT = 390>
<PARAM NAME = ARCHIVE VALUE   = SwingTest.jar>
<PARAM NAME = "IMAGE_WIDTH" VALUE   = "256">
<PARAM NAME = "IMAGE_HEIGHT" VALUE   = "256">
<!--"UNUSED PARAMETERS..."-->

</APPLET>
-->

<!--"END_CONVERTED_APPLET"-->

</body>
</html>When a user with a virgin machine hits your web page, the following sequence of steps will occur:
At the time of this writing it was not possible to confirm that Java 3D could be automatically installed by the Java 2 plug-in. Sun claims that this will work, but I experienced a number of problems running on Windows 98, which prevented me from verifying this.
It should be possible to create a Java 3D applet that would install the Java 2 SDK, then install Java 3D and the Java 3D applet or application into the Java 2 extension directory and finally run the applet.
There are a number of useful articles on Suns web sites covering the Java 2 extension mechanism:
Security is a complex topic for applets. When SwingTest is running as an applet, it is subject to the Java sandbox principle. The applet can only read and write files from its own codebase (the URL that contains the applet). Indeed, some care must be taken while programming to ensure that applet-safe APIs are used to access files. In general, you will need to work exclusively with URL objects, as direct access using files does not always work, even when using the applets codebase.
When you run the SwingTest example you will notice the following exceptions:
Failed to save image: java.security.AccessControlException: access denied (java.io.FilePermission image.jpg write)java.security.AccessControlException: access denied (java.lang.RuntimePermission exitVM)
The first exception occurs because the applet cannot write the captured image onto the local file system, while the second exception occurs because applets cannot call System.exit to exit the JVM, but are rather under the control of the Java 2 plug-in.
Access permissions can be configured using the Java 2 security policy descriptors. A full discussion of Java 2 security is beyond the scope of this book. For more details refer to
http://java.sun.com/j2se/1.3/docs/guide/security/Installation of Java 2 client-side applications, particularly those requiring other extensions (such as Java 3D applications) is still undergoing changes and improvements. This is a bit of a mixed blessing since some of this work has been going on for about two years. However, the Java WebStart initiative demonstrates that Sun is taking the installation issue seriously.